DIY Faux Pearl Garland
5:00 AM
Hey Guys! I'm Whitney, from Whitney J Decor. I'm a New Orleans based Interior Designer, but I also blog about Interior Design/decorating and offer E-Decor services to those outside the New Orleans area. I specialize in making small spaces more functional (like itty-bitty living rooms, bedrooms, or even dorm rooms).
Today I'm going to show you how to make a super simple faux pearl garland for your Christmas tree. The garland doesn't have to be used on a tree, you can put it in a cute, clear glass vase, drape it on a wall or furniture, or even just add it to your Christmas tablescape.
This garland will bring some glam to your Christmas decor, and would be great on trees added to a bedroom, or even a dorm room. You can even decorate the really small 2' trees (or smaller) with this garland. Just make sure that you plan for the size you need.
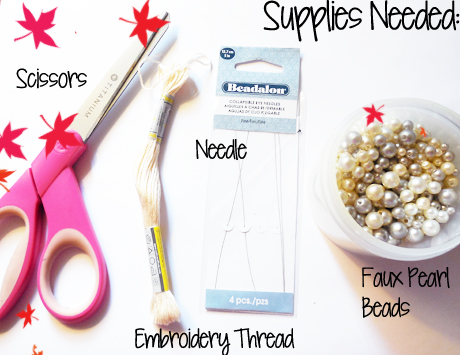
First things first. Here's the supplies you need:
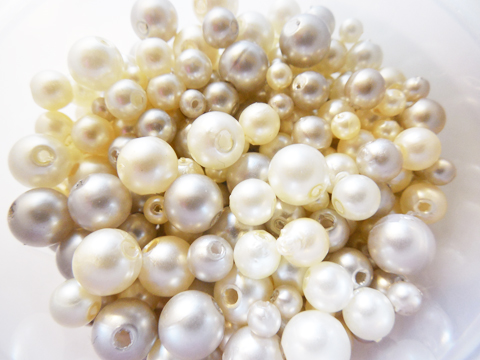
Here's a closer look at the faux pearl beads I chose. Mine was a mixture of cream, pearl, and soft pewter:


knot, too.
Here you can see the finished garland. I always separate all my garland/ornaments on a table before I put them on a tree.

You should always start decorating your tree with the garland first (longest garland first). If you're doing a sweeping pattern with any of your garland, you should put that garland on after you put the other ones on, even if it's the longest. In my case, my faux pearl garland that I'd just made was the longest, and I wasn't doing a sweeping, or draping pattern, so I started with that one first. You can see it, along with my other garland, in this picture:

Here's a closeup view of the tree with the ornaments on it. See how the garland fits perfectly with the color scheme:
And here's a pic of the full tree with the ornaments and lights on:
This is a 4' tree and as you can see it's small and can easily sit on a table. It's great for any room, but my favorite place to put these small trees are in bedrooms. You can even put one in a dorm room to bring holiday cheer.
So, I hope you found this project as easy as I have. It takes some time to string all the beads on the embroidery thread (it took me about 45 minutes total), but once you're done, you'll have garland that could be used for years to come.
You can use different kinds of beads for this project, like clear acrylics that look like crystals, real crystals, or even colored beads. It's really up to you to create a garland that you'll love.
I want to say thanks to the ladies of SLS for having me come over and guest post. Drop by my blog for more Christmas decorating ideas and decorating tips.
Right now, I'm offering free 1 hr design consultations (via phone or Skype) for subscribers of my VIP decor newsletter. During this consultation, you can ask me anything related to your space(s), I'll review pictures of your space(s), and offer suggestions of changesadditions you can make. This offer is good for any space, even small rooms and dorms. I'm also offering $99 E-Decor packages all this month to help update/refresh your spaces for the New Year. These two offers are only available to subscribers of my newsletter.
Till next time,
Whitney J

Today I'm going to show you how to make a super simple faux pearl garland for your Christmas tree. The garland doesn't have to be used on a tree, you can put it in a cute, clear glass vase, drape it on a wall or furniture, or even just add it to your Christmas tablescape.
This garland will bring some glam to your Christmas decor, and would be great on trees added to a bedroom, or even a dorm room. You can even decorate the really small 2' trees (or smaller) with this garland. Just make sure that you plan for the size you need.
First things first. Here's the supplies you need:
- Scissors
- Embroidery thread - You can get this from anywhere. I got mine from Michaels. Make sure you get a length long enough for your tree. Mine was 8.5 yards. It's just right for my 4' tree, but if you have a full size tree or you want to have your garland draping the tree instead of just simply strung around the tree, you should get more thread. You can easily tie separate pieces together to get the size garland you need.
- Needles - I'm using collapsible eye needles, because they're flexible, long, and very easy to use. It's easy to thread the embroidery thread through the eye. You can find this in the beading section of a craft store. I got mine from Michaels.
- Faux Pearl Beads - You're going to need a whole lot of these. Michaels sells the big container for less than $8. That's what I'm using, I just put a little at a time in my jar (in the picture) to make it easier to manage.
- Glue or Clear Fingernail Polish - This is to secure the knots at the beginning and end of your garland, so it doesn't start to unravel.
Here's a closer look at the faux pearl beads I chose. Mine was a mixture of cream, pearl, and soft pewter:
Step 1:
Tie 3 knots on top of each other at one end of the embroidery thread. This ensures that the knot is too big for the beads to pass through and come off.Step 2:
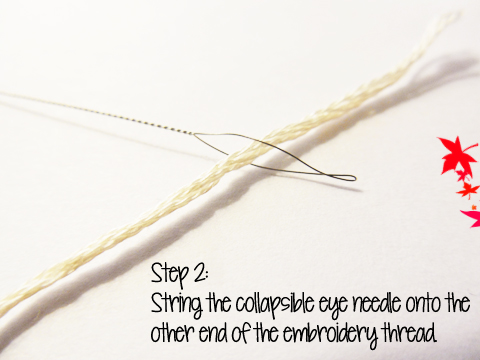
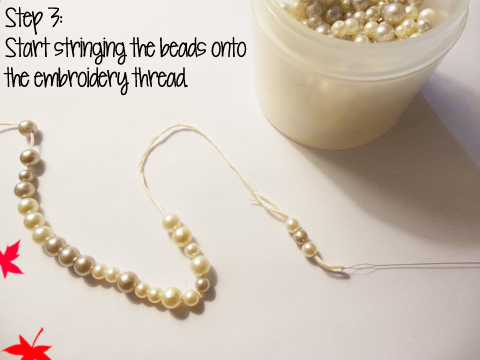
String the collapsible eye needle onto the other end of the embroidery thread.Step 3:
Start stringing the beads onto the embroidery thread and each time you've gotten about a foot of the beads on, push them all the way to the end of the embroidery thread. Keep stringing until you've gotten your desired length of garland. If you want a larger garland than the package of embroidery thread, string a separate embroidery thread with the beads and string the ends together when you're done. You can do this as many times as you'd like until you've reached your desired length.
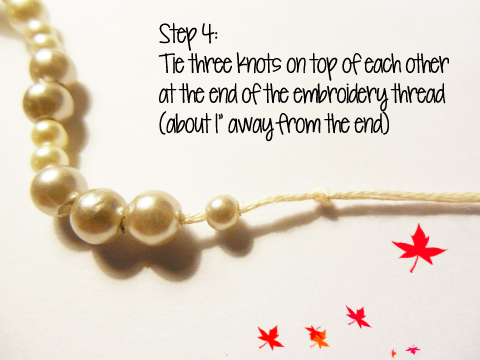
Step 4:
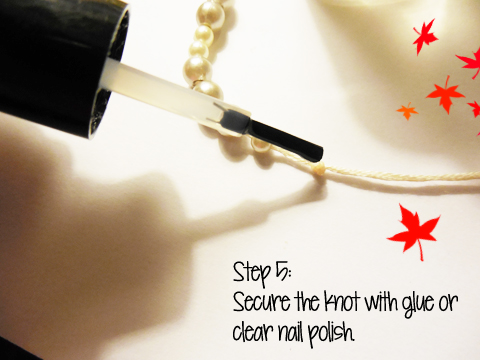
When you've reached your desired length of the garland, tie three knots on top of each other at the end of the embroidery thread like you did at the first end (about 1" away from the end).Step: 5
Secure the knot with glue or clear nail polish. This ensures the knot won't unravel. Do this at the beginningknot, too.
Here you can see the finished garland. I always separate all my garland/ornaments on a table before I put them on a tree.
You should always start decorating your tree with the garland first (longest garland first). If you're doing a sweeping pattern with any of your garland, you should put that garland on after you put the other ones on, even if it's the longest. In my case, my faux pearl garland that I'd just made was the longest, and I wasn't doing a sweeping, or draping pattern, so I started with that one first. You can see it, along with my other garland, in this picture:
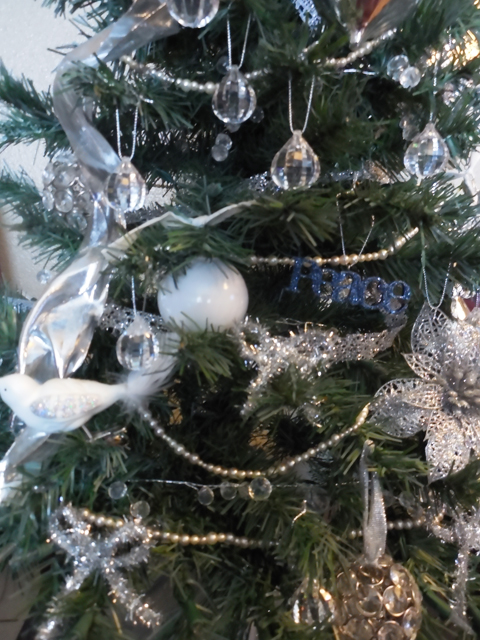
Here's a closeup view of the tree with the ornaments on it. See how the garland fits perfectly with the color scheme:
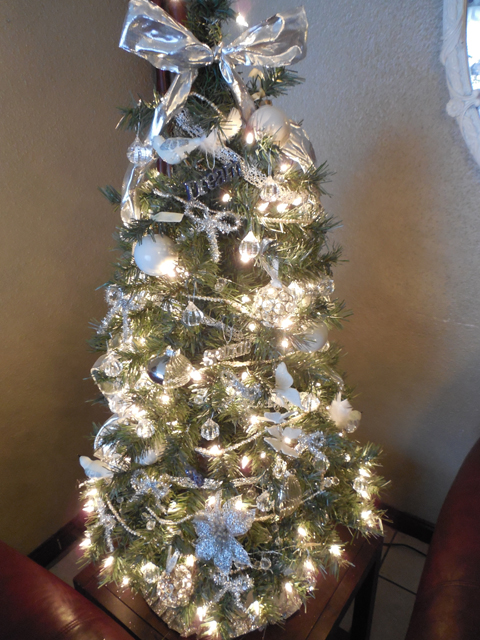
And here's a pic of the full tree with the ornaments and lights on:
This is a 4' tree and as you can see it's small and can easily sit on a table. It's great for any room, but my favorite place to put these small trees are in bedrooms. You can even put one in a dorm room to bring holiday cheer.
So, I hope you found this project as easy as I have. It takes some time to string all the beads on the embroidery thread (it took me about 45 minutes total), but once you're done, you'll have garland that could be used for years to come.
You can use different kinds of beads for this project, like clear acrylics that look like crystals, real crystals, or even colored beads. It's really up to you to create a garland that you'll love.
I want to say thanks to the ladies of SLS for having me come over and guest post. Drop by my blog for more Christmas decorating ideas and decorating tips.
Right now, I'm offering free 1 hr design consultations (via phone or Skype) for subscribers of my VIP decor newsletter. During this consultation, you can ask me anything related to your space(s), I'll review pictures of your space(s), and offer suggestions of changesadditions you can make. This offer is good for any space, even small rooms and dorms. I'm also offering $99 E-Decor packages all this month to help update/refresh your spaces for the New Year. These two offers are only available to subscribers of my newsletter.
Till next time,
Whitney J


4 comments
That looks adorable. I don't know if I'd ever break down and make it. But I'd be open to buying faux pearl garland for my tree.
ReplyDeleteLol, I know the feeling! I've had a few DIY projects still undone in my room, but this one is simple enough to do in one sitting. Thanks for stopping by Joyce!
DeleteWhat a neat idea. I love handmade anything when it comes to tree decorating.
ReplyDeleteThen this would be a great project to do! Thanks Tiffany!
DeleteThanks for stopping by The SLS! We love hearing from our readers, and want to know what you think about this post. Don't forget to follow us on Bloglovin, Facebook, and Twitter to keep up with the latest posts